

Transaction Retrieval Designer
WizCount includes dozens of built-in reports (several balance sheets, various statements, VAT report, withholding tax report, inventory value calculation, salesperson commissions, etc.). In addition to these reports, the software includes a Report Designer where any user can tailor reports to their own needs. This chapter is dedicated to teaching you how to create reports with the Designer.
The Designer is suitable for creating several types of reports:
- Multi-Columns Report: This type of report displays various data about customers, vendors, items, etc. For example: sales by customer report, item balance report.
- Statement: This type of report displays Account Card or Item Card transactions. An Accumulated Balance column may also be added. The Header of each card contains general data, such as the name of the card.
- Transactions Retrieval: These reports show a filtering of transactions, for example: sales to a particular customer during a specific period, purchase transactions of a particular item, etc.
- Price Lists: Special Price Lists can be designed for particular customers.
The following information applies to both accounting data and inventory data.
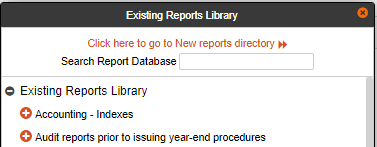
In the Reports menu, select Report planning. WizCount will open the Existing Reports Library list.
To create a new report, select: Go to New Reports Library>>
The software includes dozens of reports created using the Designer. Instead of creating a new report from scratch, you can retrieve a similar report and customize it. Learn how to Open Existing Reports below.
Create New Report
When you select Go to New Reports Library, WizCount will open window where you can select the report domain. For example: If you want to issue a journal entry report, select Accounting.
Click the + sign to view the list of reports that can be created in each domain. (Note: The list below contains reports that are currently inactive)
Accounting Data Reports
Indexes: Accounts Filtering, Balance Sheet Codes, Currencies, Transaction Types, Discount Codes, Account Sort Codes, Split Payments, Split Accounts, Costing Codes, Selection Lists and F.C Rates Index.
Bank Statements Retrieval: Retrieve transactions in Bank Statements.
Transactions Retrieval: Retrieve journal transactions in accounting. Retrieve transactions created while correcting transactions.
Export Journal Transactions: Export journal transactions from WizCount, export transactions to a text file.
Statement: Accounting Statement.
Balance Sheet: Trial Balance / Balance Report. The report displays one record (row) for each Account Key. This report can also be used to create an index (for example, an Account Index).
VAT PCN874: Reports that assist in filing the PCN874 report (online VAT report)
Withholding Tax: Reports related to reporting Withholding Tax from vendors (Report 856).
Internal Matching: Reconciled (closed) transactions reports in NIS and F.C, Non-reconciled transactions report in NIS and F.C.
Payments: Retrieve unpaid checks transactions. Temporary check transactions.
General Reports
Check for Incorrect VAT Registration number: Retrieve accounts that were found to have incorrect VAT Registration numbers.
Scheduled Tasks: Run Actions list and task settings in the Tasks To Be Issued system.
Companies List: List of companies managed in WizCount.
Account Card Changes: Changes in bank account details in customer cards (such changes may indicate an embezzlement).
Users and Permissions: The software users and the permissions granted to each user.
Cash Box Reports
Cash Box Transactions Except Payment Details: Data from the payment transaction header.
Deposits Retrieval: Retrieve deposit transactions from the cash box.
Retrieve NIS Receipts: Retrieve transactions in receipts (NIS).
Retrieve F.C Receipts: Retrieve transactions in receipts (F.C).
Point-Of-Sale: Gift vouchers, points of sale, transfer between cash boxes, means of payment count, unrealized gift vouchers and exchange vouchers index.
Marketing and Inventory Reports
Indexes: Items filtering, sales promotions, salable item lists, warehouses, alternative items, alternative numbers, serial number items and counters, salespersons, matrix items, items and salable item lists, discount codes and items, item sort codes, hourly rates and price list names index.
Price Lists: General price list, specific customer price list, special prices index and general price list transactions.
Customer Price List Transactions With Discount Codes: The report will only show data when the customer has a discount code setting configured.
Inventory: Retrieve marketing, purchase and inventory document transactions. Inventory balances report by items or by accounts. The report displays one record for each item / account. This report can also be used to create an index (for example, an Items Index).
Inventory – Import: A list or a summary of brokerage costs and transactions in import files.
Inventory – Additional: Retrieve matrix items transactions, boxes and export addresses, export WizCount inventory transactions, salesperson commissions, inventory transactions and update after count, and serial number item transactions.
Bills Of Materials: Machinery and employees index, bill of materials index, processes manufacture balances, bills of materials price list, planned vs. actual bills of materials, manufacture transactions, serial number items manufacture transactions and manufactured processes and items transactions.
Open an existing report
As previously mentioned, WizCount includes dozens of reports created using the Designer. Instead of creating a new report from scratch, it is advisable to select an existing report that is similar to the report you want to create, and customize it by making the necessary changes. To see the list of existing reports, select Report planning.
WizCount will open the window shown below:
This window contains a list of folders. Each folder contains reports that were created using the Report Designer. For example: Customer and Vendor Indexes can be found under the Indexes-Accounting folder, etc.
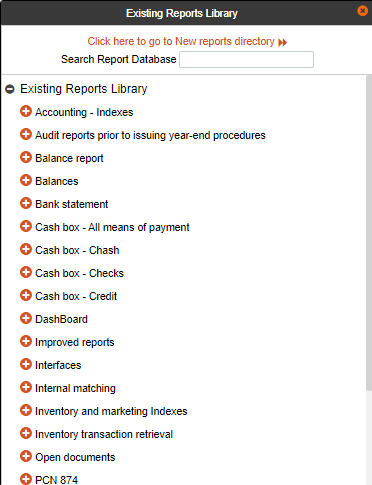
There are two ways to select a report:
- Select the appropriate folder from the list (click the + sign). WizCount will list the reports contained in that folder. Double click to select the desired report,

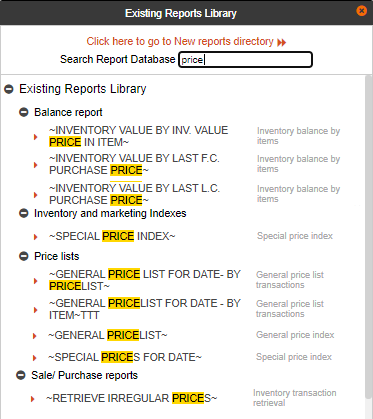
- Enter the full or partial name of the desired report in the search field at the top section of the screen. WizCount will list all the reports that include the searched text. In the example below, the word “Price” was entered, and the following reports were displayed: “Costing Codes”, “Special Prices Index”, “Inventory Value by Last Purchase Price” etc.
Balance Sheet Designer (Accounting Reports)
The Balance Sheet Designer allows you to create reports showing one record (row) per Account Card (e.g. trial balance). This Designer also allows you to create reports that show summaries for account groups without listing the accounts (for example: customer group summary). The following chapter provides information about this Designer. This information also applies to other Multi-Columns Reports, such as the Item Balances report.
The following is an example of an Account Index report.
Header: The report name will be printed as the Report Header. This name is also displayed in the Report Library.
Directory: The library (directory) in which the report will be saved. New names can be added in this window. For example: Budget.
Report Type Name: This section is read-only. In the above example the report type is: Balance.
Accounts to be included in report: here you can select the accounts filtering by account balance: Accounts with balance different from zero, Negative Balance, Positive Balance or All Accounts.
Inactive accounts: This section determines whether the report should include inactive accounts.
Print transactions: Use this section to select whether the report displays the list of transactions (or cards) or summaries only.
Print total amounts on a different background: Select Yes if you would like the report totals to be printed on a different background. If you select Yes, the Total records (lines) will be printed on a gray background (so that data records and total records can be easily distinguished).
Printing format: This section determines whether the report is printed in a portrait or landscape orientation.
Total number of transactions in report: select Yes to include the numbers of the transactions displayed in the report.
Print filtering description: An introductory page may be incorporated in the report to describe the report filtering. For example, if the Balance Sheet Report is limited to a range of Dates and Accounts, the introductory page will provide the filtering information.
Split Sorting codes totals: This section is used to select the subtotals level. Subtotals may be displayed for sort cords up to the level of thousands.
Allow printing text onto next line: If the column content is longer than the column width, you can choose between data reduction of the printed text or wrapping the text, allowing it to continue into the next row. For example: one of the columns in the report shows the account name, and in some cases the account name is too long to fit into the width of the column. In these cases, the software can either reduce the end of the Account Name, or print it into the next row.
Print report title on each page: This section determines whether to print the Report Header only on the first page or on all the report pages.
Line Spacing: Use this section to select the row spacing – normal spacing, 1.5 spacing, or double spacing.
Report description: Information about the report. This text is not printed in the report.
Add gridlines: This section allows you to add gridlines in the printed report.
Free text at the page bottom: Text to be printed at the end of each page in the report.
Report parameter: Check the checkbox in this column for sections you would like to configure when the report is issued.
Filters
Select the Filters tab (at the top section of the page) to determine the Account Cards filtering in the report.
The filters are defined by rules. The rules have an AND relationship (that is, all rules apply together).
Each rule includes several components: Field, Action, Limit From-To, Parameter, Name On Parameter Screen, Characteristics. Rule Example: The Main Account field value is Customers. In this example, the field is Main Account, and the value is From-Customer To-Customer.
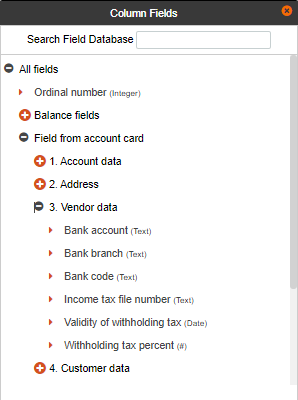
Select Add Filtering. WizCount will open the following dialogue box, where you can search for the field.

The field selection is done in the same way that was described previously for folder selection.
Fixed Value: The filtering operation will be applied to a fixed value. For example: A Sales Report is issued for Salesperson 2. To create this report, the filtering should be limited as follows: In the Add Filtering section, select the Salesperson Number field, and in the From-To limitation, select Fixed Value. Then, in the next window, enter the number 2. (meaning, the Salesperson Number is equal to the fixed number 2).
Field: The filtering operation will be applied to a value within a particular field. For example, you may want to issue a report for customers whose balance is higher than their credit line. To create this report, the filtering should be limited as follows: In the Add Filtering section, select Balance, then select Field. Then, in the Fields window, select the field Credit Limit. (meaning, the balance is larger than the value entered in the credit limit field).
Parameter: Check this checkbox if you want to set the filtering when the report is issued. For example: You may want to create a report for all salespersons, but at the time of issue you might prefer to limit the report filtering to a particular salesperson. In the Field column, select Salesperson, in the Action column select Equal To, then select the Parameter section This section will open when the report is issued, so that the report issuer can enter the salesperson number at the time of issue.
As previously mentioned, when using more than one rule, the lines have an AND relationship. Meaning, the filtering is set by the rules in all the lines combined.
Sorting
This section is used to determine the order of the records in the report.
Column Name: The sort field. For example: When issuing a Customer Index report, the Account Name field should be selected (this will sort the records by the alphabetical order of Account Names).
Parameter: Check this checkbox if you want to change the sorting order and subtotals when the report is issued.
Sorting characteristics
Sorting order: Sort in ascending or descending order. For example: the Customer Index could start with the letter A or the letter Z.
Print header: select whether to print the header by sort groups. See examples below.
Print subtotals: Select whether to calculate subtotals for each sort group. For example: When issuing a Trial Balance, subtotals can be displayed whenever the Sort Code changes. (Of course, the sort field needs to be Sorting).
Subtotals by date: When the report is sorted by Date, you can add subtotals by day / month / quarter / weekday / year.
Subtotals by some characters: When the report is sorted by a Text field, you can add subtotals by a number of characters at the beginning of the text.
Date format: Choose the date format.
Columns
This section is used to select the report columns.
Set Column Order: The columns are displayed across the screen in the same order in which they will be printed across the page.
Set Column Width: To set the column width in cm or number of characters, click in the Characteristics column, and set the desired width.
Display: The checkboxes in this columns are used to select whether to print the column or not. It is advisable not to print a column that is used for subtotal calculation. For example: If you issue a Salesperson Commissions report, you may want to display the Commission without displaying Sales.
Column Name: The selected column name. This name is customizable. For example: Instead of Account Name, you can enter the column name – Customer Name.
Column Type: The type of data that this column contains: Text, number, etc. This column is read-only.
Add Column: To add a column, select the Add Column button at the top section of the page. WizCount will open the following window:
You can add several types of columns:
- Data Column: A field that is in the data files or numbering. Different fields can be added to each report. For example: In the Balance Sheet Designer, you can add fields from the Account Record as well as Balance fields.
- Formula Column: A column that is calculated when the report is issued. For example: Sales Growth % in the second quarter compared to Sales in the first quarter.
Data Column
As previously mentioned, a data column can contain Numbering, an Account Record Field or Balance Column. When you select Numbering, the report will include a record numbering column. When you select Account Record Field, you can add any of the fields in the Account Card to the report: Account Name, Sort Code, Main Account, Address, City, Salesperson, % Of General Discount etc. WizCount will open a search window where you can select the field (see information above). For example:
Select the field and the Characteristics botton.
Path: Name of the selected field and its location path. For example: Account Record Field / 1. Account Details / Account Name.
Column width (Cm): The width of the column to be printed. The width is set in cm.
Header Font: The font and letter size of the Header to be displayed in the report. The font is selected the same way it is selected in a Word processor.
Header alignment: Choose whether the report Header is printed on the right side, left side, or in the center of the field.
Data font: The font used for data.
Data alignment: Choose whether the data is printed on the right side, left side, or in the center of the column.
Character width (Characters): This column is used to set the number of characters in the field when configuring interfaces in the Designer.
The second option for a data column is Balance fields. Select this option when you want to show the balance for a transactions filtering. For example: The balance in the first quarter.
The column selection is done according to the instructions presented above. The following are descriptions of the balance column content:
F.C Balance for transaction filtering: The balance of amounts recorded in the Total F.C field of the journal entry.
Balance for transaction filtering: The balance of amounts recorded in the Total NIS field of the journal entry.
Revaluated balance for transaction filtering: Revaluated balance to F.C of NIS transactions, or Revaluated balance to NIS of F.C transactions.
Forecasted balance for transaction filtering: The Forecasted Transactions (journal entries recorded in a forecasted batch) filtering balance.
Number of transactions in filtering: Number of transactions in the transactions filtering. For example, the number of invoices issued per customer. This field can also be used for calculating averages, for example: column 1 shows the total sales per customer, column 2 shows the number of invoices issued to the customer and column 3 shows the formula that is the result of dividing column number 1 by column number 2 – this result of this formula is the average sale to the customer.
Budget for transactions filtering: The balance of the budget in NIS for the filtering of transactions.
F.C Budget for transactions filtering: The balance of the budget in F.C for the filtering of transactions.
Most of the other sections in the Columns page were described above. The following are descriptions of sections which were not described as part of the information on sections shown when selecting the icon:
Filtering: This section is used to set the transactions filtering. WizCount will open a window as illustrated below:
The filtering is set in this window in the same way described above for setting the accounts filtering. In this example the column will show the balance of transactions of which the Transaction Type is: IC (Invoice to Customer). The filtering can be limited by any of the transaction fields: NIS Amount, F.C Amount, Transaction Type, Costing Code, etc.
Number format: Click the icon. WizCount will open a window, in which determine how many digits will be printed to the right of the decimal point, and whether a comma will be printed as the thousand’s separator.
Print Totals: Print a grand total of the column.
Year-End Transactions: This section is available only for the following columns: Budget For Transactions Filtering, Revaluated Balance For Transaction Filtering, F.C Budget For Transactions Filtering and Number Of Transactions In Filtering. This section is used for choosing how to process Year-End Transactions. These transactions are recorded at the end of the year (or the end of the quarter). They close the Income And Expense Cards against a Capital and Surplus Card. Example: To issue a report of Sales Cards for the time period starting in October of the previous year and ending in February of the current year, select: No Year-End Transactions, so that the software ignores the closing transactions recorded at the end of December. On the other hand, when issuing a Trial Balance without limiting the start date, it is advisable to choose to Include Year-End Transactions, otherwise the income and expenses cards balance will include the transactions of previous years. Finally, if a Trial Balance is issued for the previous year, it is best to choose to Include Year-End Transactions Until (Date): and then specify the previous Year-End Transactions Date for the reported year. Otherwise, the balance in each Income and Expenses Card will be zero (due to the year-end transactions).
Revaluation
When you select the Revaluated balance for transaction filtering column, WizCount opens the Revaluation window (in addition to the windows mentioned previously):
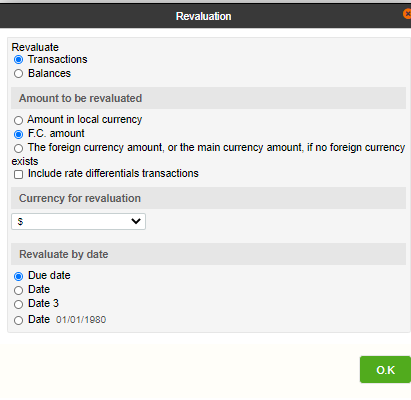
Revaluate: Balances or Transactions can be revaluated. When selecting Balances, the software first calculates the column balance, and then revaluates the balance at the rate corresponding to the date specified in the report. When choosing to revaluate Transactions, the software will revaluate each Transaction at the rate corresponding to the date of the Transaction, then summarize the revaluated amounts.
Amount to be revaluated: This section is used to select which transaction amount should be revaluated. The options are: (1) Amount in local currency, (2) F.C. amount, (3) The foreign currency amount, or the main currency amount, if no foreign currency exists. (This method is suitable for businesses that only use the F.C Amount field to enter amounts that have a Reference and are not a revaluation of the amount in local currency). In addition, it is necessary to determine whether the rate differentials transactions should be revaluated as well (since rate differentials are a type of revaluation, they should be ignored in certain reports).
Currency for revaluation: The revaluation currency. The currency is selected from the Currency Table. If you select Index as the currency, an additional window will open (see more information below).
Revaluate by date: This section defines the date of the exchange rate that will be used to revalue the transactions. The transactions can be revaluated by any of the transaction Date fields (Due Date, Reference Date, Date 3) or any other date selected for the purpose of this report.
When revaluating for a future date, the software adjusts for the Forecasted Inflation that was preset for the selected currency. (To revaluate future transactions by the last known exchange rate, enter 0 as the Forecasted Inflation).
Index Revaluation
When revaluating by the Consumer Price Index, the software adjusts the amounts for the CPI. This revaluation is slightly different from foreign exchange revaluation.
The index is recorded in the same way as the foreign exchange rates. However, since the index is published once a month (and applies to all the transactions of the month), it is recommended to enter the index value:
- For the 1st of each month, or
- For the 15th of the month corresponding to the index.
In the revaluation window, in the Revaluation Currency section, select CPI (this currency represents the Consumer Price Index).
Select whether the Base Date for calculating the index-linked amount is the Reference Date or the Due Date of the transaction. The software will read the CPI corresponding to the Base Date, retrieve the difference rate between the current index and the base index, and calculate the index-linked amount.
Formula Column
As previously mentioned, a formula column can be added to display the results of calculations involving other data fields.
Select the Add Formula Column button ![]() . WizCount will open the following window:
. WizCount will open the following window:
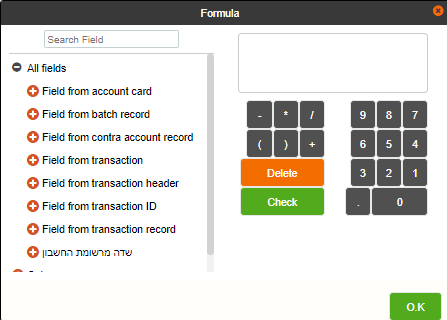
The formula is specified in this window. A formula consists of numeric fields from the Account Record (Account Balance, Order Balance, General Discount, etc.), other columns in the report and operators. Select the fields and columns as previously instructed, and select the operators using the buttons at the bottom of the screen.
View Report
To view a Preliminary Display of the report, select the Issue button from the toolbar.
WizCount will display the report on the computer screen as it would be printed on the printer.
Toolbar
At the top of the screen, WizCount displays the current page number and total pages in the report: ![]() .
.
To zoom in on the screen, click + or – ![]() .
.
To print the report on the printer, select the printer button: ![]() .
.
To download the report to your computer, click: ![]()
Report Menu
The report menu includes the following options:
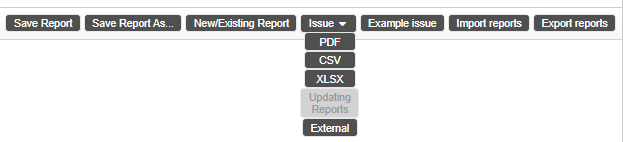
Save Report: Save the report by its current name.
Save Report As: Save the report by another name.
New / Existing Report: Open an existing report or a new report.
Issue: You can issue the report as a soft copy (PDF file), or save it as a CSV file or XLS file (Excel file).
Sample Issue: This function allows you to preview the issued report.
Export Reports: This allows you to export a report for another user in another organization. WizCount will open the Select Export File dialogue box, where you can select the report to export. Once the report is selected, WizCount will open a Save As dialogue box, where you can select the export file name and location. The file contains the settings of the selected report. To open this file on the receiving computer, use the Import function (see below).
Import Reports: To import a report exported using the previous export function, select Import. WizCount will display the RepDirectory (the designated directory for WizCount reports) and the files created (*.rpx files) using the Export function. Select the file to import and click the Open button.
Export To Excel Spreadsheet
To export your report output to Excel, select Issue>XLS from the menu. WizCount will open a Save As dialogue where you can select the spreadsheet name in Excel and the file location.
The report is displayed in the Excel sheet, including the column headers and the report name.
Note: When exporting a report to Excel, it is recommended that the report be without totals. It is best to use the Excel sheet to calculate and display totals.
Additional Designers
The Balance Sheet Designer previously described is only one of our available Report Designers. In addition to this Designer, the software includes other Designers to issue Statements, Transaction Retrieval Reports, Indexes, etc. The procedure for utilizing these Designers is similar to the one described above for utilizing the Balance Sheet Designer. Below are descriptions of the additional Designers and their unique characteristics.
Statement Designer
The Statement Designer allows you to issue reports in the Accounting Statement format. The account details are printed at the top of each card, and the account transactions are printed below.
Accounts to be included in report: This section allows you to limit the statement by the cards balance. The available options are: All Cards, Cards with Non-Zero Balance, Cards with Debit Balance Only, Cards with Credit Balance Only, or Zero-Balance Cards Only. The balance is checked according to the filtering of transactions selected for the statement.
Include Regular/ Forecasted / Budgetary transactions: These sections allow you to limit the transactions in the statement by Batch Type (Regular/ Forecasted / Budgetary Batch).
Open transactions in bank reconciliation / Internal Matching: The statement can be limited to open transactions (in NIS or F.C). Remember, open transactions are the transactions creating the balance of the card.
Transactions in temporary file: the statement can include transactions that are still saved the temporary file (these transactions are still in draft status and may be deleted or changed).
Rate differentials transactions: Exchange rate differentials are transactions that reconcile the NIS balance to the foreign exchange balance (or vice versa). This section defines whether to include these transactions in the statement. You can also issue a statement exclusively for these transactions.
Amount updated transactions: Transactions of which the amounts have been recorded through the F.C Amounts Update Program in the journal entries. The options are: All Transactions, Transactions with Updated amounts, Transactions without updated amounts, or Transactions from last Update.
Filtering
The statement filtering can be limited by the fields of both Account Cards and Transactions.
Field from transaction header / Record: The journal transactions in WizCount are recorded in two tables. The general details of the transaction (dates, references, etc.), transaction Total Amount, Main Debit Account and Main Credit Account are recorded in the Transaction Header table. If the transaction includes more than one Debit Account or more than one Credit Account, the subsequent transactions will be recorded in the Transactions Records table. You can limit the filtering of the transactions in the statement by the fields in either table.
Field from account record: In this section, you can limit your statement by the fields in the Account Record (Sort Code, Balance Code, City, etc.).
Columns: This section allows you to limit the section by one of the columns in the report. For example, you can create a statement that includes transactions that belong to a specific Costing Code.
Columns
This section determines which columns will be displayed in the statement, and how the columns will be sorted on each card. WizCount will open a window where you can choose the desired fields. A statement can include fields from journal entries or account records. (Of course, when you include an account record field, the same data will be displayed in all the records (rows)).
Transaction Retrieval Designer
This Designer issues reports in an Accounting Transactions Retrieval report format. It can be used to restore batches or retrieve a filtering of journal transactions.
Columns: When you choose to add a new column, WizCount will open the following window:
Field from transaction header: This section is used for adding fields that appear in a journal entry using the shortened method. The Transaction Header includes the following fields: Reference 1, Reference 2, Reference 3, Reference Date, Due Date, Date 3, Rate Differentials, Primary Credit Account, Primary Debit Account, Quantity, Currency, Header Number (of the transaction), Batch Number, Transaction F.C Total, Transaction NIS Total, Batch Type and Transaction Type .
Field from Debit/ Credit record: These sections allow you to add data from the Debit Account Record or the Credit Account Record. For example: You can include a column of the Account Name and Phone Number of the Debit Account (or Credit Account).
Prepared Reports
The following is a brief description of the reports in the Accounting Transaction Retrieval Report Designer library:
Transactions Retrieval – Year-End Transactions: All the transactions recorded in batch number 9998 (this batch includes the transactions that are created as a result of Year-End Transactions carried out at the end of the year or quarter).
Batch In Shortened Format: A batch copy, printed in the shortened format (as in the Windows version). This report is printed in a portrait orientation.
Batch In Shortened Format – Detailed: A batch copy. This report is printed in the landscape orientation on the page and includes all the columns in the previous report, plus the following fields: Debit Account Name, Credit Account Name, Date 3, Reference 3, Quantity and Costing Code.
Payment To Vendors: A transactions list of payments to vendors: all the transactions in which debit the vendor cards and credit the bank cards.
Index Designer
The Index Designer allows you to create reports in an index format.
Costing Codes Index
Foreign Currency Rates Index
Customer Index
Vendor Index
Bank Statement Designer
This Designer allows you to issue reports of transactions recorded on Bank Statements (these transactions are recorded through the Input Bank Statement section).
Bank Statement Transactions Retrieval: A filtering of the Bank Statement transactions.
Reconciled Transactions – Bank Statement: A filtering of transactions marked as reconciled (on the Bank Statement).
Open Transactions – Bank Statement: A filtering of transactions marked as unreconciled (on the Bank Statement).
Internal Matching Designer
This Designer allows you to issue reports of open (or reconciled) transactions on Customer Cards, Vendor Cards, or other Creditors and Debtors Cards. Remember, open transactions are the transactions creating the balance of the card. WizCount includes three Designers in this section:
Reconciled Transactions Report: A filtering of the reconciliations recorded for the Account Card. This report only shows local currency closings.
Reconciled F.C Transactions Report: A filtering of the transactions recorded in the Account Card. This report only shows F.C closings.
Non-Reconciled Transactions Report: A filtering of the non-reconciled or partially reconciled transactions.
The following is a brief description of the reports available in this Report Designer library:
Partially reconciled transactions: Partially closed transactions (when receipts are marked as partial payment on account).
Reconciled transactions in F.C: Transactions which were reconciled by foreign currency.
Reconciled transactions in NIS: Transactions which were reconciled by NIS.
Non-Reconciled F.C Transactions: The open transactions on the card. This report lists the amounts in foreign currency.
Non-Reconciled NIS Transactions: The open transactions on the card. This report lists the amounts in NIS.
Report Designers – Marketing and Inventory
The Report Designers of the Marketing And Inventory software are very similar to the Report Designers of the Accounting software, and the procedure for utilizing all of these Designers is identical.
Index Designer
This Designer is used to issue Index Reports (e.g. Items Index)
This Designer’s library includes the following reports:
Items Index, Sorted By Item Type: Filtering Settings Index.
Special Prices Index: List of special prices (price per customer and per item).
Warehouses Index: List of warehouses (warehouse number, description and notes).
Vendor/ Customer Numbers: Reports showing the item’s vendor/ Customer Numbers defined for the customer or vendor.
Salespersons Index: List of Salespersons (Salesperson Number, Name, and Notes).
Alternative Items Index: Reports showing the item’s defined Alternative Items.
Discount Codes Index: List of discount codes defined for the company.
Sort Codes Index: Index of Headers recorded in the items’ sort codes.
Transaction Retrieval Designer
This Designer allows you to retrieve a filtering of Inventory Transactions.
An Inventory Transaction – and therefore the Report Designer – include the following elements:
- Header (for example: customer name, invoice tax, total invoice amount, etc.)
- Transactions (Item Records).
In addition, inventory transactions can be linked as Closing Documents and Base Documents (e.g. an invoice based on a delivery note).
The following is a brief description of the reports provided in the Transactions Retrieval Reports library for Marketing and Inventory.
Sale/Purchase Reports
Retrieve irregular prices: Documents where the discount % given was larger than the discount % specified for the customer.
Sales by Items: Summary of sales quantity and amount by items.
Monetary item sales by quarters: Total sales per item listed by quarters.
Open Documents
Open Orders By Customers: The list of open orders, sorted by customers. (the grand total of all orders is presented for each customer).
Open Orders By Items: The list of open orders, sorted by items. (the grand total of all orders is presented for each item).
Open Delivery Notes By Customers: The list of open delivery notes, sorted by customers. (a summary of all open delivery notes is presented for each customer).
Open Delivery Notes By Items: The list of open delivery notes, sorted by items. (a summary of all open delivery notes is presented for each item).
Balance Report Designer
The Inventory Balance Report Designer is similar to the Accounting Balance Sheet Designer. It can be used for issuing reports which list a single balance record per customer or per item. You can also use it to create a report containing only general summaries.
The first step is to choose whether the Designer will show the balances by customers or by items. Then, you can include the (monetary or quantitative) balance columns, as well as data from the Account Card or Item Card record.
The prepared reports library for this Designer, in the Balance Report directory, includes the following reports:
Dead Inventory: The items for which there has been no Inventory Transactions.
Items Availability: The remaining quantity available. (Inventory Balance plus Purchase Order Balance minus Customer Order Balance).
Balance By Warehouse: The balance in each warehouse. By default, this report is preset for Warehouses 1 – 5. Of course, you can add and remove warehouses in the report.
Inventory Value By Item Inventory Value Price: This report shows the Inventory Balance for each item, and the item’s Inventory Value according to the last updated Inventory Value Price.
Inventory Value By Last Purchase Price: This report shows the Inventory Balance for each item, and the item’s Inventory Value according to the Last Purchase Price. Two reports are available – one in NIS and one in dollars.
Profitability By Item: The gross profit from the sales of each item.
Price list Designer
The Price List Designer allows you to issue different items price lists. You can issue a customer’s price list (according to the customer’s special prices and discounts) or a general price list. This Designer’s library includes the General Price List Report, which presents prices and their validity start date.