

Accounting information is recorded in WizCount using two types of records:
- Journal Entries;
- Documents (invoices, receipts, checks, etc.).
When documents are issued in WizCount, the appropriate journal entries are recorded automatically. However, there are cases where accounting needs to be updated without issuing documents. These cases are when journal entries are used.
The journal entries are first recorded in a temporary file, used as a draft, and then transferred to the fixed file, which makes up the company’s books of accounts.
Journal entries are recorded in batches. Each batch contains a group of journal entries. Every batch must be balanced. Each batch has a serial number.
The journal entries are recorded as described below. To save the batch in the temporary file, nothing needs to be done (whenever a batch is recorded, it is saved in the temporary file). To transfer the batch to the fixed file, select Post To Fixed File.
Journal entries
In the journal entry screen each journal entry is displayed in a single record (line) on the screen. Because the journal entries include many fields, it is sometimes necessary to scroll the screen horizontally. To see the Transaction’s list of Account Cards and Amounts, press the + button at the beginning of the record, near the record serial number.
To adjust the column width of a certain column in the Sheet View, move the cursor over the border of the column heading. The curser turns into a bar with a double arrow. Now click and drag the double-arrow cursor to the left or right to change the column width.
To change the columns order, move the cursor over the column you want to move, then right-click and drag the column to the desired location. Unclick when the column is in the desired location.
To search for data in a particular column, go to the column header row. WizCount will open an additional line where you can enter a search value. The software will display records (rows) where this value applies.
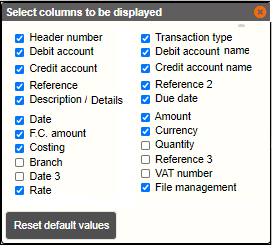
You can control which fields are not displayed in the sheet view. Right click the column header row. In the dialogue box that opens, select the columns you would like to display.
Sort Batch Transactions: To sort the records (rows) in the table, click the desired column header. Click again to reverse the sort order.
Reorder Columns: You can change the order of columns (fields). Select a column and drag it to the desired location. Click the left mouse key over the column, then hold and move the mouse over the desired column location.
Filter Records: You can apply a filter to the journal transactions in order to display only records that match a particular search criterion. Go to the column header row. WizCount will display another row, above the column header row, where the filtering criterion can be entered for the desired columns. You can enter any string of characters into the filter field of columns such as Details or Reference, and the software will display all the journal entries that contain these character strings (in the filtered fields). In Date columns, you can enter a specific date, and the software will display all the transactions containing that date. In the Amount columns, you can enter a range of amounts, e.g. 100–300, and the software will display all the transactions with amounts within this range (the dash “–” must be entered between the amounts). To display all the transactions, delete the search criteria.
Insert Record: To insert a new record (row), move your mouse over the record where you want to add the new record, then select Insert Record in the right-click menu. The new record will be added above the record you have placed your mouse over.
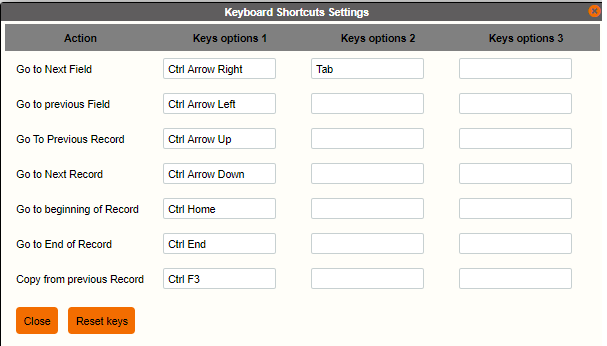
You can switch between fields not only by using your computer mouse but also by using designated keyboard keys. You can change the keyboard setting in the top menu on the Journal Entries >> Keyboard Settings page.
You can also reset and return to the default settings on that page.
Journal Entry Fields
The various fields recorded in journal entries are described below:
Header Number: The header transaction number (the Header includes the Reference and Date fields etc.). This number cannot be changed.
Transaction Type: The Transaction Type determines which accounts participate in the journal transaction and how the transaction amount is split between these accounts. For example, assuming the VAT rate is 17%, the Transaction Type for a “raw material purchase invoice” can split the total amount of the invoice as follows: the Raw Material Purchase Expense Account will be charged 100%, the VAT On Input Account will be charged 17%, And the Vendor Account (recorded upon transaction posting) will be credited 117%. (117% indicates the amount of the invoice including VAT). Transaction Types can be opened on the Transaction Types page. If the current transaction includes a Transaction Type, the Transaction Type Code should be entered in this field. If the transaction does not have a Transaction Type, you can skip this field.
Debit Account / Credit Account: If a code is entered in the Transaction Type field, WizCount will put the appropriate accounts in place, and you will be required to complete the missing accounts according to the Transaction Type settings. For example: If the Transaction Type is “Customer Invoice”, WizCount will place the Income Card (and VAT Card) on the Credit side and request that you enter the Customer Account on the Debit side. If the Transaction does not include a Transaction type, the appropriate Debit and/or Credit Accounts should be entered as necessary.
In the Sheet View, WizCount displays the Main Debit Account and the Main Credit Account. If the journal entry has more than one Debit Account or Credit Account, click the + button (located on the left side of the page) to display all the Account Cards and Amounts.
In transactions without a Transaction Type, you can add an unlimited number of Debit and Credit records.
If you do not remember the Account ID, enter the digits or letters that are in the Account ID or Account Name. As you type, Account IDs and Names will be suggested to you according to the characters you have entered. Then, you can select the appropriate Account from the suggested list.
You can open a new account or update data on an existing account at any time through the right-click menu. (You can also open and update Account Cards in the Account Card tab).
Amount: This field is used to record the total amount of the transaction in the main currency. It is not necessary to specify whether the amount is in Credit or Debit, since WizCount will debit the account that was preset as the Debit Account, and credit the account that was preset as the Credit Account. In transactions where a Transaction Type is specified, WizCount will split the amount between the cards according to the ratios defined in the Transaction Type. As previously mentioned, in a Sheet View, to display how the split is made, press the + button (located on the left side of the page).
Currency / Rate / F.C Amount: WizCount is a multi-currency software. In addition to the amount in the main currency, you can record the amount in F.C. In the Currency field, select the currency of the F.C amount. For example: When an Export Invoice to Europe is recorded in Euros, the Currency section should be used to indicate that the currency is Euro. The default is $. In transactions without foreign currency the default ($) should be left unchanged. In the F.C Amount field, enter the amount in foreign exchange (in the currency entered in the previous section). If foreign exchange currency is not used, this field may be ignored. The M.C Amount and F.C Amount entered do not have to be matched according the exchange rate (which should be the Due Date rate) That is, the F.C Amount does not have to be an accurate product of the amount in M.C and the exchange rate. WizCount will split the amount between the cards according to the ratios defined in the Transaction Type. As previously mentioned, in a Sheet View, to display how the split is made, press the + button (located on the left side of the page). It is recommended that you enter the F.C Amount only when there is a Reference for the F.C Amount, e.g. when recording an import document or an export document. There is no point in entering the F.C Amount only for revaluation purposes, because it is more convenient to perform the revaluations when issuing reports.
Reference / Reference 2 / Reference 3: A Journal Entry contains 3 reference fields. The first two Reference fields are usually used as follows:
|
Document |
Reference |
Reference 2 |
|
Tax Invoice to Customer |
Invoice Number |
Delivery Note/Order Number (the order corresponding to the invoice) |
|
Customer Receipt |
The invoice number repaid by the customer |
Receipt Number |
|
Tax Invoice from Vendor |
Delivery Note/Order Number (the order corresponding to the invoice) |
Invoice Number |
|
Vendor Payment |
Check Number |
The vendor invoice number that was repaid with this check |
Reference 3 is intended to resolve cases where there are more than 2 references to a document. For example: The delivery note number and the customer’s order number can be saved in the tax invoice record. In this case, the record will be made as follows: Reference 1 – Invoice Number, Reference 2 – Delivery Note Number, Reference 3 – Order Number.
Date / Due Date / Additional Date: A Journal Entry contains 3 date fields. Typically, the Reference Date specifies the document’s date of issue, and the Due Date indicates the Payment Date. Here are some examples of how to use these dates:
Document | Date | Due date |
Tax Invoice to Customer | Invoice issue date | The date on which the customer is expected to pay the invoice |
Customer Receipt | Receipt issue date | Check payment date |
Tax Invoice from Vendor | Invoice issue date | The date in which the invoice should be payed |
Vendor Payment | Check issue date | Check payment date |
When recording Budgetary Batch Transactions, the date fields are used to specify the Budget Period. The Date field used to record the budget period start date, and the Value Date field is used to record the budget period end date. For example, an educational institution establishes the school year budget, from early September 2016 until the end of June of the next calendar year. In this case, the date 1.9.2016 will be entered in the Date field, and the date 30.6.2017 will be entered in the Due Date field.
Date 3 is added to the Reference date and the Due Date of the Transaction. Companies issuing quarterly balance sheets can use this date to indicate the end of the quarter. These companies must their Balance Sheet and Loss and Profit Statement immediately at the end of each quarter. As a result, these companies often receive Purchase Invoices from vendors after their financial statements have already been submitted. To overcome this problem, these companies can use the Company Settings page to set Yearend Routines to take place on Date 3, and then use the Date 3 field to record the end of the quarter. This way, if an invoice arrives after filing the VAT report, it will be included in the next quarter’s financial statements and will be reported to VAT (on the PCN874 report) with its original date.
Costing: WizCount can be used for costing management. To do this, for each expense or income transaction, the costing department that the transaction belongs to should be specified. There are two types of costing departments: Cost Centers and Overhead Costs. In the costing report, WizCount calculates the direct income and expenses of each costing center and burdens the indirect expenses and income on the various cost centers according to predetermined criteria. Cost Center settings can be defined through the Account Cards menu.
Details: This field may be used for recording additional details associated with this transaction. For example: In a sale to the “Miscellaneous Customers” Card, it is recommended to record the customer’s name.
Quantity: This field allows to keep quantitative information of non-inventory items. For example: F gold business, you can record the weight sold in the transaction in the Quantity field and issue a report indicating how much gold was sold during a particular period.
Rate Differentials: Check this checkbox if the current transaction is a M.C or F.C Rate Differentials Transaction. Rate Differentials Transactions are transactions that adjust the M.C balance to a foreign exchange balance.
Batch Actions Menu
A list of actions is displayed at the top section of the page. Click the desired action to start.
Change batch: Click on Change Batch for the Temporary File Batch List to open, where you select an existing batch or open a new batch.
Default values: You can set the default field values. Using default values can save typing time. For example: If the current batch includes journal entries recording the salaries in August 2021, you can enter 31.08.2021 as the default Date field value, and “August 2021 Salary” as the default text in the Details field. This note will appear by default in the Details field of all the batch records. After selecting the Default Settings Action, WizCount opens the window where you can set default field values.
Key settings: This option is used to select the keyboard shortcuts for navigating across different fields without using a computer mouse.
Post batch to permanent file: Use this option to transfer the journal entries in current batch into the fixed file. As previously mentioned, once the journal entry is saved in the fixed file, it is part of the company’s books of accounts, and they may not be deleted. Before posting the batch, WizCount Checks the validity of the data in the batch (for the list of checks, see Batch Check below)
Print Batch: Select this Action to print the batch. The batch can be printed before posting it to the fixed file.
Batch Check: Select this option to check the batch (before saving it in the fixed file). The check will ensure that:
- the batch is balanced.
- the batch is balanced in F.C (use the Settings screen to determine whether the batch must be balanced in F.C as well).
- the batch is balanced by years (the transactions with a Reference date from the same year must be balanced).
- the batch data is valid, as previously explained.
The Batch Check menu also includes the Check invoices duplicate option. Before posting the batch, it is recommended to check for duplicate journal transactions. This check is particularly essential when recording purchase invoice journal entries, for ensuring that none of the purchase invoices have already been previously recorded. (Sale invoices do not require this check because they are recorded automatically)
The software will display a list of suggested duplicate transactions. The check does not only include journal transactions from the current batch, but also previous journal transactions from the beginning of the tax year.
Two transactions are suspected as duplicate transactions when they meet the following conditions (combined):
- At least one of the References (First or Second Reference) is identical, or at least the last 3 digits are identical,
- The Reference Date is identical,
- The amount in M.C or F.C is identical,
- One of the Debit or Credit Accounts is an Expenses Account (this condition ensures that the record is a Purchase Invoice).
Additional options on selected records
The second line of the menu lists actions that can be performed on journal transactions. To carry out one of these actions –
- Select the desired transactions by clicking the checkboxes in the Selection field (left side of the page).
- Click on the action you want to carry out.
Delete Selected Records: This action will delete the records (rows) you have selected.
Total of records: Choose option from the menu. Display the Total of marked records (i.e. a Summary of all the records that were selected), Total of all the records in batch (i.e. a Summary including all the records) or a Total Up To first selected record (i.e. a Summary of all records up to the first selected record).
This action allows you to detect where imbalance in the batch starts.
Copy Selected Records: This allows you to copy transactions from one batch to another. Mark the transactions you want to copy and select Copy Selected Records. WizCount will open a window where you can choose the batch to which the transactions will be copied. WizCount will place the copied transactions in this batch.
Revaluate Selected Record: As previously mentioned, in each transaction you can enter a M.C Amount and a F.C Amount. If only one of the amounts was entered, you can press Revaluate Selected Record and WizCount will revaluate the other amount according the currency exchange rate. The revaluation is done according to the exchange rate on the Due Date of the Transaction. If no rate is available for that date, WizCount will check for another available rate within 31 days of that date and use it to revaluate the amount. In any case, a rate can be specified manually for revaluation. Exchange Rate Updates are recorded on the Exchange Rates page. In fact, this function is not necessary, because it is more convenient to perform the revaluations when issuing reports.
Available actions for batches in permanent file
Once journal transactions are saved in the fixed file, they can be corrected and used to create other journal transactions.
Go to Accounting Menu> Journal Entries> Display batches in permanent file. The software will open a window containing the batch list in the fixed file. Select the desired batch from this window by selecting the Open sheet green icon on the right.
In the Action on selected Records page the following options are available:
Total of records: WizCount will create a summary of the Debit and Credit amounts in all the selected transactions.
Copy Selected Records: This allows you to copy transactions from one batch to another. Mark the transactions you want to copy and select Copy Selected Records. WizCount will open a dialogue box where you can choose whether to copy the selected records into an existing batch or into a new batch. When the desired option is selected, press the Copy button.
Entry Cancellation For Selected Records: When a journal transaction is saved in the fixed file, it must not be deleted. If an error is detected in the Amounts or the Account Cards, an Entry Cancellation transaction must be recorded. Select the transactions for which you want to record an Entry Cancellation transaction, then select Transactions Entry Cancellation.
Select from the menu whether to record entry cancellation to selected transactions or, create the entry cancellation transactions to a group of filtered transaction.
Reverse Accounts or Sign: Entry Cancellation can be recorded in to ways: For example, if the original transaction debited a certain customer and credited sales for 1000 NIS, then the Entry Cancellation transactions may include:
Accounts: A transaction debiting Sales and crediting the customer (reversing the Debit and Credit) for the same amount as above; or
Sign: A transaction debiting the customer and crediting Sales (as the original transaction does) for -1000 NIS (minus one thousand NIS).
Value for details field: The References and Dates are copied from the original transaction. The only field that can be changed is: Details.
What to do with existing matches: You can record a match between the Entry Cancellation transaction and the original transaction. This section is used to determine what should be done if the original Transaction is already matched (with some other Transaction).
Batch for entry cancellation: You can select the number of an existing temporary file batch, and the Entry Cancellation transactions will be added to that batch. However, it is recommended to select the Open New Batch option so the transactions will be recorded into a new batch in the temporary file. When done, click Entry Cancellation For Temporary File Batch.
As previously mentioned, this Action is only be used batches in the fixed file (if the batch is in the temporary file you can simply delete transactions instead of recording Entry Cancellations).
Notes:
(1) Documents are cancelled using a Canceling Document (e.g. an invoice should be canceled using a credit invoice), rather than an Entry Cancellation transaction.
(2) Entry Cancellation transactions cannot be recorded for journal transactions in batch 9998 (the batch where Yearend Routine Transactions are recorded). Year end transfers can only be cancelled through the Yearend Routines screen.
Correct Transactions: If errors were detected in fixed file journal transactions, e.g. errors in Reference fields, Dates, etc., the transactions can be corrected by using the Correct Transactions action.
To correct a journal transaction –
- Open the batch (from the fixed file).
- Go to the transaction you want to correct.
- Click the Correct Transaction action.
- WizCount will open a dialogue box where you can correct the values in the transaction fields.
- To finish, select Update Fixed File.
Notes:
(1) In light of the instructions provided in the Tax Authority’s book management directives, this form of corrections is limited to the following fields: Transaction Type, Reference, Reference-2, Reference-3, Date, Due Date, Date 3, Notes, Quantity, Currency. An Account ID or Transaction Amount correction must be made using Entry Cancellation transactions (and re-entering the correct transaction).
(2) In batches 9997-9999, the Reference and the Reference-2 fields cannot be corrected (this is because these References are recorded in the inventory files – they are used as the documents references).
Record journal entries complying with online VAT report PCN874
Businesses and organizations must file an online VAT return (PCN874). WizCount issues the report based on journal transactions. The journal transactions must be recorded according to the following rules:
Do not record single-entry transactions: Do not record documents using single-entry journal transactions (debit only/credit only). All documents should be recorded using journal entries that include a Transaction Type. The same invoice is allowed to be recorded using several journal transactions. However, as stated before, each journal transaction must be balanced and all transactions must be recorded in accordance with the instructions on this page. When issuing an 874 Report, WizCount will merge various transactions belonging of the same invoice into one transaction.
Invoice Date: In all journal transactions, enter the Document Date (Invoice Date) in the Reference Date field (the first Date in the journal transaction).
Invoice Number: In all the journal transactions of Sale Documents (invoices for customers), the Invoice Number must be entered in the Reference field (first Reference). In all the journal transactions of Purchase Documents (invoices from vendors), the Invoice Number must be entered in the Reference-2 field (second Reference field).
The structure of Documents Journal Transactions (where the VAT rate is 17%) is:
Document | Debit Acc. | % | Credit Acc. | % |
Sale Tax Invoice | Customer | 117
| Income Vat on Output | 100 17 |
Credit Invoice | Income Vat on Output | 100 17 | Customer | 117
|
VAT Exempt Sale Tax Invoice | Custome | 10 | Exempt Income | 100 |
VAT Exempt Credit Tax Invoice | Exempt Income | 100 | Customer | 100 |
| ||||
| ||||
Purchase Invoice | Expenses Vat on Input | 100 17 | Vendor | 117 |
Purchase Credit
| Vendor | 117 | Expenses Vat on Input | 100 17 |
VAT Purchase Invoice 2/3 | Expenses Vat on Input | 106 11 | Vendor | 117 |
VAT Purchase Invoice 1/4 | Expenses Vat on Input | 113 4 | Vendor | 117 |
Export Account: If the export includes an Export Document, the Export Document number must be entered in the Reference 3 field. If the export does not include an Export Document, the Reference-3 field should remain blank.
Import document: an Account Card must be opened in the accounting system for VAT On Import (in addition to the VAT On Input Card) for VAT on input of imported goods (i.e. VAT paid for goods received from abroad). The Import Document Journal Transaction should debit the aforementioned Vat On Import Card. Enter the Import Document Number in the Reference-2 field (Second Reference). When issuing Report 874, the VAT on Import Cards filtering should be recorded (this filtering will indicate said VAT Card).
Sales / Purchases to/from the Palestinian Authority: The journal transactions of invoices to customers and the invoices from vendors in the Palestinian Authority are the same as the journal transactions of regular invoices, except that the VAT rate is different. All customers and vendors in the Palestinian Authority should share the same filtering (when the new 874 Report is issued, this filtering should be noted).
Invoices for Chance Customers: When selling to Chance Customers (various customers), the maximum amount of each invoice (before VAT) is 5,000NIS. If the amount is higher, the Customer Key appearing on the invoice should be the Account ID of one of the fixed customers that have a VAT registration number, Company Number or ID number on record (not a Chance Customer Card). Sale invoice journal transactions for Chance Customers look like regular invoices, except for said difference (debiting a Chance Customer Card instead of a Customer Card with a VAT registration number, company number or ID number). It is permissible to record Chance Sales (for smaller amounts than said maximum amount) in a Cash Box Card (instead of a Chance Customer card) with a debit, but when issuing an 874 Report, the Cash Box Card must be defined in the Chance Customers filtering.
POS Sales Journal Transactions: When selling through a Point Of Sale, POS, each voucher is considered to be a tax invoice and recorded in a separate journal transaction. However, POS Sales Journal Transactions are recorded based on the amounts in bulk Z. The tax authority’s directive is that POS Sales journal transactions should include not only the sale amount but also the vouchers amount. When an 874 Report is issued, the software reads the POS invoices quantity from the Reference field (first Reference). The vouchers quantity must be recorded in one of the Sales Summary Transactions (in the other transactions, enter 0).
The Cash Box Card, which is the contra account for POS Sales, should be different from the Cash Box Card recorded in Chance Customers Sales Transactions (through tax invoices and receipts).
If POS sales are imported into WizCount from another software, the software house must be instructed to record the vouchers number in the Reference field of one of the transactions, and record 0 in the other transactions. Of course, if this data is not sent by the software house, the sales number can be added manually.
Petty-Cash: Petty-Cash journal transactions are recorded in the same structure as a purchase invoice (in the Expense Card with a debit and in the Payee’s Card with a credit). In the field Reference 2 (second Reference), record the quantity of invoices that were incorporated in the journal transaction. For example, if the journal transaction is for 20 parking invoices, enter the number 20 in Reference 2. If the journal transaction includes only one invoice, enter 1 in Reference 2. In the Date field (first Date), enter the record date. The total amount of VAT On Input in all the Petty-Cash transactions for a particular month should not exceed 2% of the total amount of VAT On Input in that month or 2,000 NIS, whichever is greater.
Substitute Vendor Invoice (an invoice issued by non-invoicing services vendor): The following journal entries must be recorded for each Substitute Vendor Invoice:
| Debit Acc. | % | Credit Acc. | % |
Tax Invoice | Vendor (Service provider) | 117 | Income Vat on Output | 100 17 |
Purchase Invoice | Expenses Vat on Input | 100 17 | Vendor (Service provider) | 117
|
Income cancellation | Income from Substitute Vendor invoice | 100 | Vendor (Service provider) | 100 |
Of Course, an additional journal transaction will be recorded following the payment (including withholding tax).
Record Journal Transactions Against Income And Expense Cards: When preparing the VAT report, the software retrieves all journal transactions from the income and expense cards of which the contra account is a Customer Card, Vendor Card, Creditors And Debtors Card or Surplus Card. For example, if you (mistakenly) record a journal transaction that debits an Income Card and credits an Employee Card (Creditors And Debtors Card), the transaction would be considered a VAT-exempt sale.
Purchase Invoices Arrived After Previous Report: WizCount marks the invoices that have been reported, and automatically detects unreported invoices and includes them in the next report. In companies that submit quarterly financial statements, invoices sometimes arrive after the financial statements were submitted. For these companies, we recommend using Date 3 to indicate the quarter period. See more information on Date 3 above.
Record Journal Transactions Of Nonprofit Organization VAT-Applicable Documents
Purchase Invoice: Purchase invoices are recorded in one transaction, as described below:
Debit |
| Credit | |
Expense Vat On Input | 100 0 | Vendor | 100 |
In this example and in the following examples, the number ‘100’ indicates the total amount of the invoice (including VAT).
You can split the amount between several Expenses Cards in the same Transaction, for example:
Debit |
| Credit |
|
Expense A Expense B Vat on Input | 60 40 0 | Vendor | 100 |
The record structure above also applies to an invoice received from a vendor from the Palestinian Authority.
Petty-Cash: Nonprofit organizations do not have to include Petty-Cash transactions in their 874 Report, but they are allowed to do so. If you want to include Petty-Cash transactions in a 874 Report, they must be recorded as a purchase invoices, except that the payee (e.g. courier) is listed as the vendor. For example:
Debit | Credit | ||
Expense Vat on Input | 100 0 | Payee
| 100
|
You can split the amount between several Expenses Cards in this case as well.
Rules:
- Record one (not single-entry) transaction
- The Transaction includes a Vat On Input Card debit for an amount of 0.
Only the above transactions are included in Report 874. Credit Card and Import transactions are not included in a Nonprofit Organization report (or financial institution report), although they include VAT. This is because the Israel Tax Authority is already informed about these transactions through customs reports, and because unlike regular business reports, nonprofit reports do not have to match the VAT payment (since no payment is made).
Substitute Vendor Invoice: When a nonprofit is charged without a tax invoice, it does not issue a Substitute Vendor Invoice, but rather records a journal entry structured as follows:
| Debit Acc. | % | Credit Acc. | % |
Expense Record
| Expense (including VAT) VAT on Input | 117 0 | Vendor Withholding tax | 100 17 |
An Account Card should be opened for anyone requiring a Substitute Vendor Invoice issued. then, the service recipient number (the nonprofit organization producing the substitute vendor invoice) is recorded in this account card. As per usual, an additional journal transaction will be recorded following the payment (including withholding tax).
Post Batch Group To Fixed File
You can save several batches in the temporary file, and then post all of them to the fixed file in a single action.
Select Input a group of batches from the Accounting > Journal entries menu